Next.js 13 Layouts by Example

This post was originally published on the Mechanical Rock Blog
Next.js has been a tool of choice here at Mechanical Rock for some time and so we were excited to see what Vercel, the makers of Next.js, would reveal at the second Next.js Conf just a day ago. One of my great frustrations with using Next.js in the past has been the implementation of Layouts particularly when it comes to nested routing.
Until now, we had several ways for managing layouts such as inspecting the router.pathname to figure out which components to render or allowing the page to delegate what layout it uses through a static function like getLayout but neither of these options made it easy to nest our layouts. If you’d like to read more about these options, there is a great article written by Adam Wathan that talks about managing Persistent Layout Patterns in Next.js and the poor developer experience they provide.
Thankfully, at Next.js Conf, Vercel revealed a new file-based router build on top of React Server Components to enable first class support for layouts, nested routing, loading states and more which I’d like to dive into a bit more detail below.
One of the big changes that you will notice coming from Next.js 12 and earlier is the addition of the /app folder which is similar to the /pages folder however components within /app are React Server Components by default.

Within the /app folder we are going to create several route segments with each segment mapped to a URL path. Within those folders, Next.js provides a set of special files which include:
- page.tsx is used to define the UI of a route.
- layout.tsx is used to define a UI that is shared across multiple pages. This is what we use to nest layouts creating nested routes.
- loading.tsx is used to define the loading UI for a specific part of the app.
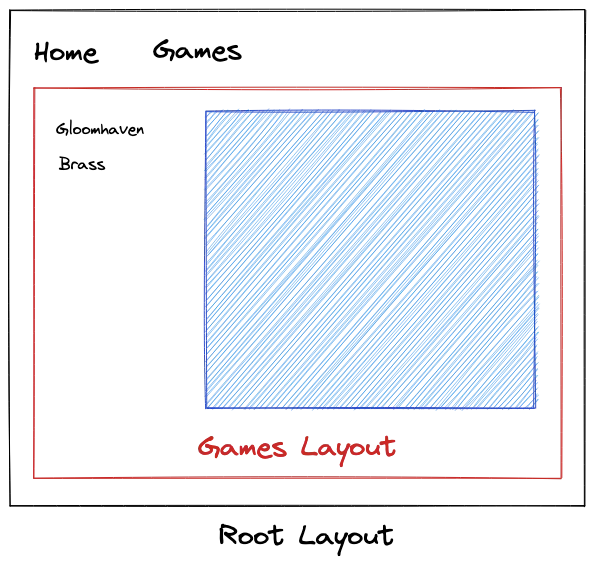
With this in mind, we are going to look at an example which makes use of nested layouts to create nested routes based on the wireframe below. We are going to create a root layout that contains the navigation bar and another layout that shows a list of games the user can click to get more information about them.
Check out the example repository on Github here
The Root Layout
When you create a new Next.js project with the /app folder; it will automatically create a RootLayout for you. Within this we are simply going to add a header and navbar with a couple of links to other pages.
// /app/layout.tsx
import Link from "next/link";

export default function RootLayout({
  children,
}: {
  children: React.ReactNode,
}) {
  return (
    <html lang="en">
      <head>
        <title>Next Layout Example</title>
      </head>
      <body>
        <header>
          <nav>
            <Link href="/">Home</Link>
            <Link href="/games">Games</Link>
          </nav>
        </header>
        <div>{children}</div>
      </body>
    </html>
  );
}
Adding a Nested Layout
So far, we haven’t done much different from Next.js 12 and earlier but now the really cool new stuff starts with creating our /app/games/layout.tsx component. As mentioned earlier, any components within the /app folder are React Server Components by default which allows us to define our component as async such that it will fetch the data for the component on the server before sending static HTML to the user.
This allows us to create relatively clean components without having to use useEffect to manage the asynchronous communication with the server as we would currently, resulting in the component below.
// /app/games/layout.tsx
async function getGames() {
  const res = await fetch("http://localhost:3000/api/games");
  return res.json();
}

export default async function Layout({
  children,
}: {
  children: React.ReactNode,
}) {
  const games = await getGames();

  return (
    <div>
      <ul>
        {games.map((game: Game) => (
          <li key={game.id}>
            <Link href={`/games/${game.id}`}>{game.name}</Link>
          </li>
        ))}
      </ul>
      {children}
    </div>
  );
}
From here we can define our page files in both /app/games/page.tsx and also /app/games/[id]/page.tsx which will be rendered next to the list of games that we fetched in the component above. Also, thanks to Suspense being added in React 18, this component will not render until it has received the data it needs to render. This will currently block the transition to the games page until the content has been rendered on the server so it makes sense for us to define a fallback component while the content is loading which can be done with a loading.tsx file.
Loading States
You can define a loading state at any level of your app and it will apply to any components further down the file tree. In this case we include a very simple loading component at the root of the app which will apply to all the other components that get created.
// /app/loading.tsx
export default function Loading() {
  return <p>Loading...</p>;
}
To further exercise how loading states are selected, here’s another example of a loading state that is defined at the /app/games/ level which will only be selected in or below this route.
// /app/games/loading.tsx
export default function LoadingGames() {
  return <p>Loading Games...</p>;
}
Pretty cool right?
Mixing in Client Components
While we are focusing on user experience, it makes sense to highlight to the user which page they are on in our navigation bar which requires the app to have some information about what is going on in the client. Components within the /app folder are by default React Server Components but we can easily change them to client components by adding a 'use client'; statement at the top of our file.
We could make the entire root layout component a client component but that would mean the rest of our component tree would have to be client components since a server component can only import other server components. Thus, it makes sense to create a wrapper around the Link component and import that into our root layout. In this component we will use a new hook from next/navigation called useSelectedLayoutSegment that tells us which URL segment we are currently on.
// /app/NavLink.tsx
"use client";

import React from "react";
import Link from "next/link";
import { useSelectedLayoutSegment } from "next/navigation";

export default function NavLink({
  href,
  children,
}: {
  href: string,
  children: React.ReactNode,
}) {
  const segment = useSelectedLayoutSegment();
  const active = `/${segment}` === href;

  return (
    <Link className={active ? "underline" : ""} href={href}>
      {children}
    </Link>
  );
}
We can then replace any instances of Link in our root layout with our newly created NavLink and still get the benefits of server components throughout our application.
If you’d like to find out more about the new Next.js Layouts check out this documentation page or check out the talk by Sam Selikoff at Next.js Conf which a majority of this example is based on.