Managing React application state with Context

Photo by Marvin Meyer on Unsplash
This post was originally published on the Mechanical Rock Blog
The question of how application state is going to be managed is one of the most important considerations when it comes to building with React and can often be the difference between ending up with a performant and testable system or a pile of tech debt. There are many state management libraries available for React, with another popping up every other week that it is often difficult to compare and make a decision on which one to use.
But what if I told you that the best way of managing application state is actually built into React.
Before I get to that I feel like its important to look into where we have come from, namely Redux which has long been considered the default when it comes to managing React application state.
Why you might not need Redux anymore
When Facebook released React back in 2013, it also publicised the Flux pattern as a way of structuring your applications since it complimented the composable view components by utilising a unidirectional data flow to make systems predictable and easy to test.
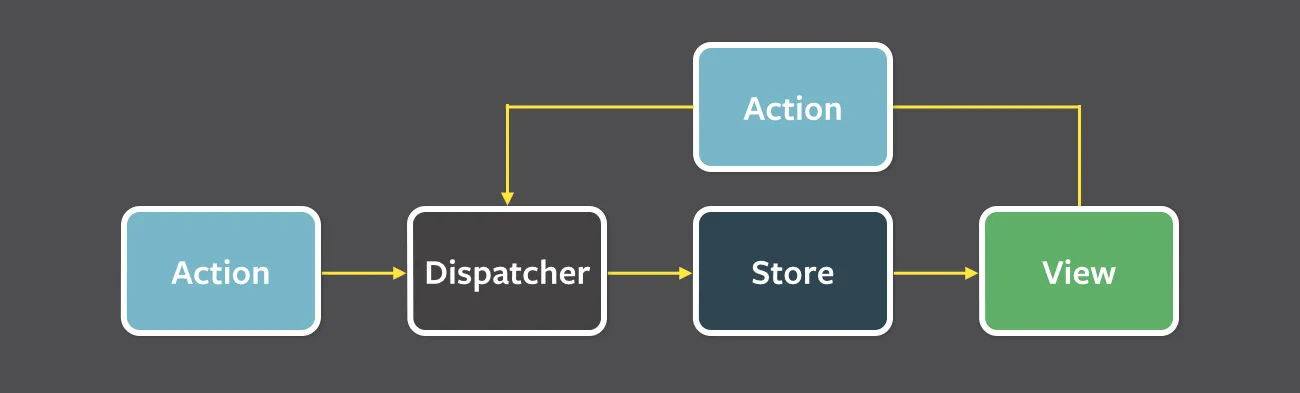
In the Flux Pattern, there is a centralised Store which contains state to be shown in the View. The only way to modify that state is through dispatching Actions through a Reducer function (not shown but is essentially the Dispatcher in the diagram) which updates the store by returning the new state.
Redux was created as a way of formalising the Flux pattern within your React applications, it provided a structure for managing your store, reducers and actions and quickly became the defacto standard for managing state. This resulted in a healthy developer ecosystem being built around Redux including the popular Redux development tools which allowed developers to rewind through actions that have been applied to the store to aid in debugging. One issue Redux helped with is it allowed you to reduce prop drilling; where you would pass component props through multiple levels of the component tree resulting in a somewhat negative developer experience.
However, one of the main complaints about Redux has always been the amount of boilerplate code needed to get started. I’ve seen many teams reach for Redux as a default when starting a new application when the local state management tools built into React is enough for their use case; they will often spend more time setting up Redux than actually building their application. Another issue I’ve found with Redux is how it enforces a single store for all of your application state which leads to the store being convoluted and any attempts to organise this mess involves deeply nesting your state.
By using Context, we can resolve some of these issues since we are not limited by the opinions enforced by Redux however it does still require some boilerplate code. The benefit of using something built into React is that we can choose to implement it at any time with little to no increase in our overall package size and it is something developers may be familiar with already.
Using Context for Application State
Using the same principles that Redux was built on, we can manage our application state using something that is built into the React library, namely Context. Context was introduced to React as a way of passing data to multiple components without having to pass props down manually, i.e. prop drilling. For example, if your application has multiple visual themes that a number of the components relies on, it would be cumbersome to pass that data to each of the components using props therefore it would make sense to use Context to centrally manage the current theme and have those components access that value when required.
In our example, we have a simple application that displays a count and allows us to increment, decrement and set the value manually. I like to use TypeScript to improve the developer experience since it allows us to set up our State and Action types and benefit from the type checking prior to runtime. We begin by setting up each of the aforementioned actions and defining what our state will look like which in this case just keeps track of the count.
// countProvider.tsx
type Action =
  | { type: "increment" }
  | { type: "decrement" }
  | { type: "setValue", payload: { value: number } };
type State = {
  count: number,
};
type Dispatch = (action: Action) => void;
We follow this by setting up our reducer function which is exactly the same as it would be if we were using Redux; it is a pure function that takes the state, applies an action to it and returns the new state. I have set up handlers for each of the Actions I defined above which will allow us to increment and decrement the count as well as setValue of the count.
// countProvider.tsx
function CountReducer(state: State, action: Action): State {
  switch (action.type) {
    case "increment":
      return {
        ...state,
        count: state.count + 1,
      };
    case "decrement":
      return {
        ...state,
        count: state.count - 1,
      };
    case "setValue": {
      return {
        ...state,
        count: action.payload.value,
      };
    }
    default:
      throw Error(`Unhandled action type: ${action!.type}`);
  }
}
Notice how I am careful not to directly change the existing state but instead copy the it using the spread operator (...) with our changes applied on top of it. The reason for this is so that React correctly identifies that a change has been made to the state which triggers a re-render of the components that rely on that state. If I were to instead mutate the existing state and return that, React would think that nothing has changed since it doesn’t do a deep comparison of the object values and therefore wont trigger a re-render.
Next, I set up Context for both the State and Dispatch and provide a function component that determines how the Reducer we created above will be used. I also provide a way of setting the initial state which aids in testability since you can establish a given state in your tests before performing actions to see how the system behaves.
// countProvider.tsx
const CountStateContext = (createContext < State) | (undefined > undefined);
const CountDispatchContext =
  (createContext < Dispatch) | (undefined > undefined);

const CountProvider: FC<{ init?: Partial<State> }> = ({ children, init }) => {
  const initialState: State = {
    count: 0,
    ...init,
  };

  const [state, dispatch] = useReducer(CountReducer, initialState);

  return (
    <CountStateContext.Provider value={state}>
      <CountDispatchContext.Provider value={dispatch}>
        {children}
      </CountDispatchContext.Provider>
    </CountStateContext.Provider>
  );
};
I then wrap our App in the CountProvider component, ensuring that all of the components that rely on the State or will perform Actions on that state are encapsulated as children of this component. In my case, the Header component does not use the count state or perfom actions on the count so I can inject it outside of our CountProvider.
// App.tsx
function App() {
  return (
    <div>
      <Header />
      <CountProvider>
        <CountDisplay />
        <CountButtons />
        <CountInput />
      </CountProvider>
    </div>
  );
}
Finally, I provide some convenience functions which allow us to easily access the our State and Dispatch actions within components along with providing some error feedback if we are trying to access them outside of our CountProvider.
// countProvider.tsx
export function useCount(): [State, Dispatch] {
  const state = useContext(CountStateContext);
  const dispatch = useContext(CountDispatchContext);
  if (state === undefined || dispatch === undefined) {
    throw new Error("useCount must be used within a CountProvider");
  }
  return [state, dispatch];
}

export function increment(dispatch: Dispatch) {
  dispatch({ type: "increment" });
}

export function decrement(dispatch: Dispatch) {
  dispatch({ type: "decrement" });
}

export function setValue(dispatch: Dispatch, value: number) {
  dispatch({ type: "setValue", payload: { value } });
}
I’ve included some examples below of what this looks like within our components.
// CountDisplay.tsx
const CountDisplay = () => {
  const [{ count }] = useCount();

  return <div>{count}</div>;
};

// CountButtons.tsx
const CountButtons = () => {
  const [, dispatch] = useCount();

  const onIncrement = () => {
    increment(dispatch);
  };

  const onDecrement = () => {
    decrement(dispatch);
  };

  return (
    <div>
      <button onClick={onIncrement}>Increment</button>
      <button onClick={onDecrement}>Decrement</button>
    </div>
  );
};
And thats how we are able to manage application state using Context which is built into React.
There is one thing that should be mentioned and that is performance. Whenever the value of the Context changes, it triggers a re-render of all the child components of that Context which, in our use case isn’t all that bad. However, if you have a large number of child components or those components are computationally expensive to render, you may want to look at the solutions provided in this Github Issue.
I’ve included all of the code shown above in a Github Repository along with tests and an example of how to increase the performance of your components.