Azure AD Authentication in Cypress Tests with MSAL
This post was originally published on the Mechanical Rock Blog
It has been a little over 2 years since I wrote about Azure AD authentication in Cypress tests and as such, it is out of date. In that time, Cypress has gone from strength-to-strength but the big change in that time has been the migration from the Azure Active Directory Library (ADAL) to the Microsoft Authentication Library (MSAL). In this post, I will discuss how to authenticate with MSAL in your Cypress tests making reference to the change in approach from that post 2 years ago as a result of the migration.
If you’d just like to get the solution I’ve created a demo repo on Github which you can reference.
The issue that originally inspired this blog post is that when a user tries to log into an app with Azure Active Directory (AD), they are redirected to a login portal to authenticate and allow the application to get a valid token. However, Cypress doesn’t like this approach since it applies the same strict same-origin policy that browsers do thus failing the test when it tries to access a different domain to your app.
Since version 9.6.0, Cypress supports multi-domain workflows but if we use this approach, we would have to write a test that validates the Microsoft authentication flow which isn’t ideal because we don’t control it.
Our solution involves performing the Azure AD login process in the background so that when the tests run, there is already a valid token. Since most web applications will use @azure/msal-browser under the hood, it should also be web framework agnostic and require no changes to the application code.
So, at a high level we will:
- 1. Acquire a token from Azure AD 🔑
- 2. Save the token to the session storage 💾
- 3. Run the test ✅
- E2E testing approach
We will do all this in a Cypress command so that we can run cy.login() to authenticate with Azure AD before our tests run. Custom commands are created in the cypress/support/commands.ts file by default.
1. Acquire a token from Azure AD 🔑
The first step involves making a request in the background using some of the information available on your Azure dashboard under App Registrations. For this we will need the client and tenant IDs as well as generating a client secret. One important change from the previous article is that we are now using a grant_type of password instead of client_credentials which I will discuss further in E2E testing approach. As a result, we will also need to create a test user so we can use their login credentials to run the tests.
It is important to note that this test user:
- Must have MFA disabled
- Must not be a guest user
- You must log in at least once via the UI to grant consent to the requested scopes
Now, we can emulate the request a browser makes to the Azure token endpoint when a user enters their login details on the page.
Cypress.Commands.add("login", () => {
  cy.request({
    method: "POST",
    url: `https://login.microsoftonline.com/${Cypress.env(
      "AZURE_TENANT_ID"
    )}/oauth2/v2.0/token`,
    form: true,
    body: {
      grant_type: "password",
      client_id: Cypress.env("AZURE_CLIENT_ID"),
      client_secret: Cypress.env("AZURE_CLIENT_SECRET"),
      scope: "openid profile email",
      username: Cypress.env("USERNAME"),
      password: Cypress.env("PASSWORD"),
    },
  }).then((response) => {
    // defined in step 2
    injectTokens(response);
  });
});
As you can see, there are a number of references to Cypress.env('...'); we can store all these values in the env within our cypress.config.ts (as shown below) but we should be careful not to commit this change as the client secret and password are secret values. Instead we should pass them through environment variables when running tests on our CI server. i.e. CYPRESS_AZURE_CLIENT_SECRET and CYPRESS_PASSWORD
{
  "env": {
    "AZURE_CLIENT_ID": "<Azure client ID>",
    "AZURE_TENANT_ID": "<Azure tenant ID>",
    "AZURE_CLIENT_SECRET": "<Azure client secret>",
    "USERNAME": "[email protected]",
    "PASSWORD": "password1234"
  }
}
Now that we can successfully obtain a token for our test user, we can now move onto saving that token into session storage so that it gets picked up by @azure/msal-browser.
2. Save the token to the session storage 💾
Prior to making a login request, @azure/msal-browser checks the session storage for a number of values to see if a user is currently logged in and has a valid session token. If so, the user is not redirected to log in again and can simply continue using the app as expected. This step involves populating those session storage values that @azure/msal-browser expects so that we can convince it that we have already logged in through the browser.

We begin by installing the jsonwebtoken library so that we can decode the token response from Azure AD. Next, we extract some values that are used in multiple places in the session storage. These include:
idTokenClaims- this is the payload of the JWT token which contains information about the user logging in and additional datalocalAccountId- is used to identify a user within the the Azure tenanthomeAccountId- is used to uniquely identify a user in across all of Azure Active Directory
const injectTokens = (tokenResponse: ExternalTokenResponse) => {
 const environment = 'login.windows.net';
 const idTokenClaims: JwtPayload = decode(tokenResponse.id_token);
 const localAccountId = idTokenClaims.oid || idTokenClaims.sid;
 const clientId = Cypress.env('AZURE_CLIENT_ID');
 const realm = Cypress.env('AZURE_TENANT_ID');
 const homeAccountId = `${localAccountId}.${realm}`;
 ...
}
Using these values, we can reconstruct the session storage items that @azure/msal-browser expects to see when checking if a user is already logged in. We begin by assembling the session item key as follows.
const tokenId = `${homeAccountId}-${environment}-${realm}`;The session item value consists of the deconstructed token, some information about the Azure AD tenant and also the user. We then store that value in session storage.
const token = {
  authorityType: "MSSTS",
  homeAccountId,
  environment,
  realm,
  idTokenClaims,
  localAccountId,
  username: idTokenClaims.preferred_username,
  name: idTokenClaims.name,
};
sessionStorage.setItem(tokenId, JSON.stringify(token));
We follow a similar pattern for the accesstoken session item which includes details about the token expiry, session scopes and the token itself.
const accessTokenId = `${homeAccountId}-${environment}-accesstoken-${Cypress.env(
"AZURE_CLIENT_ID"
)}-${Cypress.env("AZURE_TENANT_ID")}-${tokenResponse.scope}--`;
const now = Math.floor(Date.now() / 1000);
const accessToken = {
credentialType: "AccessToken",
tokenType: "Bearer",
homeAccountId,
secret: tokenResponse.access_token,
cachedAt: now.toString(),
expiresOn: (now + tokenResponse.expires_in).toString(),
extendedExpiresOn: (now + tokenResponse.ext_expires_in).toString(),
environment,
target: tokenResponse.scope,
realm,
clientId,
};
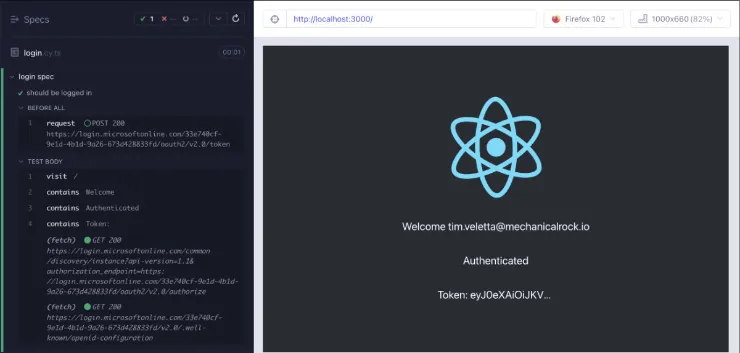
sessionStorage.setItem(accessTokenId, JSON.stringify(accessToken));Note that in the screenshot above, we had 4 items in session storage but we have only defined 2 in our example; this is because the additional items aren’t needed for the duration of our tests. One of the missing items is the refresh token that is only needed when the token expires and the other contains much of the same information as our accesstoken session item.
3. Run the test ✅
We can now write a test that demonstrates the login functionality as shown below.
describe("login spec", () => {
  before(() => {
    cy.login();
  });

  it("should be logged in", () => {
    cy.visit("/");
    cy.contains("Welcome");
    cy.contains("Authenticated");
    cy.contains("Token: ");
  });
});
Last but not least, lets see it running successfully.
E2E testing approach
One of the big changes from the previous approach was the move from using the client_credentials grant type to password. The client_credentials grant type is intended for backend-to-backend communication and is essentially anonymous which is less than ideal for end-to-end testing since we want to verify functionality from an end users point of view. Using the password grant type also allows us to test role based access control (RBAC) within our e2e tests since we can grant our test user different roles and verify the functionality corresponding to those roles. The important thing to keep in mind with this approach is to ensure that passwords created for the use in test accounts should be stored in some form of secret manager when used in continuous integration (CI) environments.
But why should you go to all this effort to test your app end-to-end (e2e) and not use other approaches such as disabling the authentication when running your e2e tests?
It’s ultimately about having confidence in what you’re deploying and being able to catch issues earlier reducing lead times and time to restore when things do go wrong.